Step 2: Color in the grass and flower stems.
(Cindy's tip: I didn't worry too much about adding texture to the grass, since I knew I was going to add a die-cut border with the
Grass Border Die.)
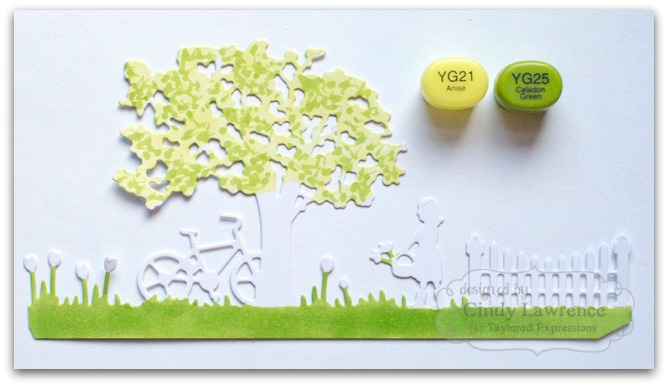
Step 3: Cover tree leaves with YG21 Copic marker.

Step 4-5: (Cindy's tip: The first thing you need to do when adding shading to any coloring project is choose your light source. I chose mine to be coming from the upper right side of the card; so I shaded accordingly, creating shadows along the side of each section that is furthest away from the light source.)
"Scribble" on a bit of YG25. Then, do the same with a smaller amount of YG17.


Step 6-8: Add brown to the trunk, fence, and basket.
(Cindy's tip: I began by coloring all of the brown areas with my lightest color, which in this case is E35. I then added streaks of E39, creating texture and shadows -- according to where my light source is, of course. Finally, I added smaller amounts of E49 to give it that extra bit of contrast and *pop*.)
 Step 9-12:
 Color the remaining elements.
Using the same light to dark coloring method, carefully color the bicycle, flowers, and girl. (Cindy's tip: I always color the skin before the hair, so I don't muddy up the face by smudging hair color into it.) Add blossoms with R43 and R46, finishing them off with a dab of Opaque White paint in the centers.
 Step 13:
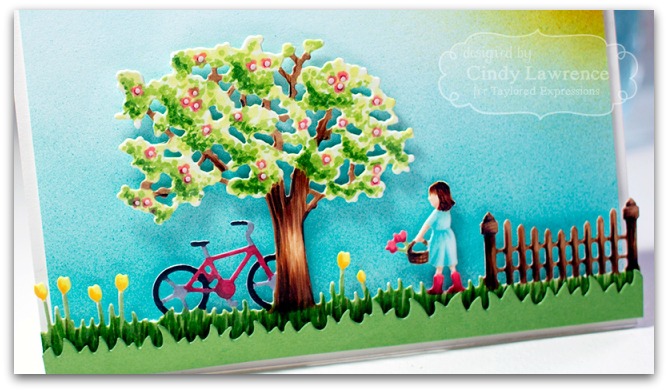
 Create a background and assemble.
Trim cardstock panel and corner round.
To create her background, Cindy used a Copic Airbrush System. She began by airbrushing the lightest color first (BG45), then went over the bottom with BG49, and added the sunshine with Y06, Y19, and YR18.
If you do not own an airbrush system, you can obtain similar results by sponging with ink or you may want to try a watercolor wash.
Final Steps: Finishing touches and assembling.
Stamp sentiment. Add enamel dots.
Adhere background panel to white cardbase. Adhere silhouette with foam. Die cut
Grass Border Die from
Peapod cardstock.

We hope you are inspired to break out your markers and get coloring! When you have made your project, visit our
Facebook Page
and share with us!